
Before You Start #
- Install Pachyderm either locally our within the cloud.
- Install Pachyderm Shell.
- Join our Slack Community so you can ask any questions you may have!
- Try out this Glob Tool to learn how to use glob patterns to select files and directories.
Context #
How Pachyderm Works #
Pachyderm is deployed within a Kubernetes cluster to manage and version your data using projects, input repositories, pipelines, datums and output repositories. A project can house many repositories and pipelines, and when a pipeline runs a data transformation job it chunks your inputs into datums for processing.
The number of datums is determined by the glob pattern defined in your pipeline specification; if the shape of your glob pattern encompasses all inputs, it will process one datum; if the shape of your glob pattern encompasses each input individually, it will process one datum per file in the input, and so on.
The end result of your data transformation should always be saved to /pfs/out. The contents of /pfs/out are automatically made accessible from the pipeline’s output repository by the same name. So all files saved to /pfs/out for a pipeline named foo are accessible from the foo output repository.
Pipelines combine to create DAGs, and a DAG can be comprised of just one pipeline. Don’t worry if this sounds confusing! We’ll walk you through the process step-by-step.
How to Interact with Pachyderm #
You can interact your Pachyderm cluster using the PachCTL CLI or through Console, a GUI.
- PachCTL is great for users already experienced with using a CLI.
- Console is great for beginners and helps with visualizing relationships between projects, repos, and pipelines.
Tutorial: Image & Video Processing with OpenCV #
In this tutorial, we’ll walk you through how to use Pachyderm to process images and videos using OpenCV. OpenCV is a popular open-source computer vision library that can be used to perform image processing and video analysis.
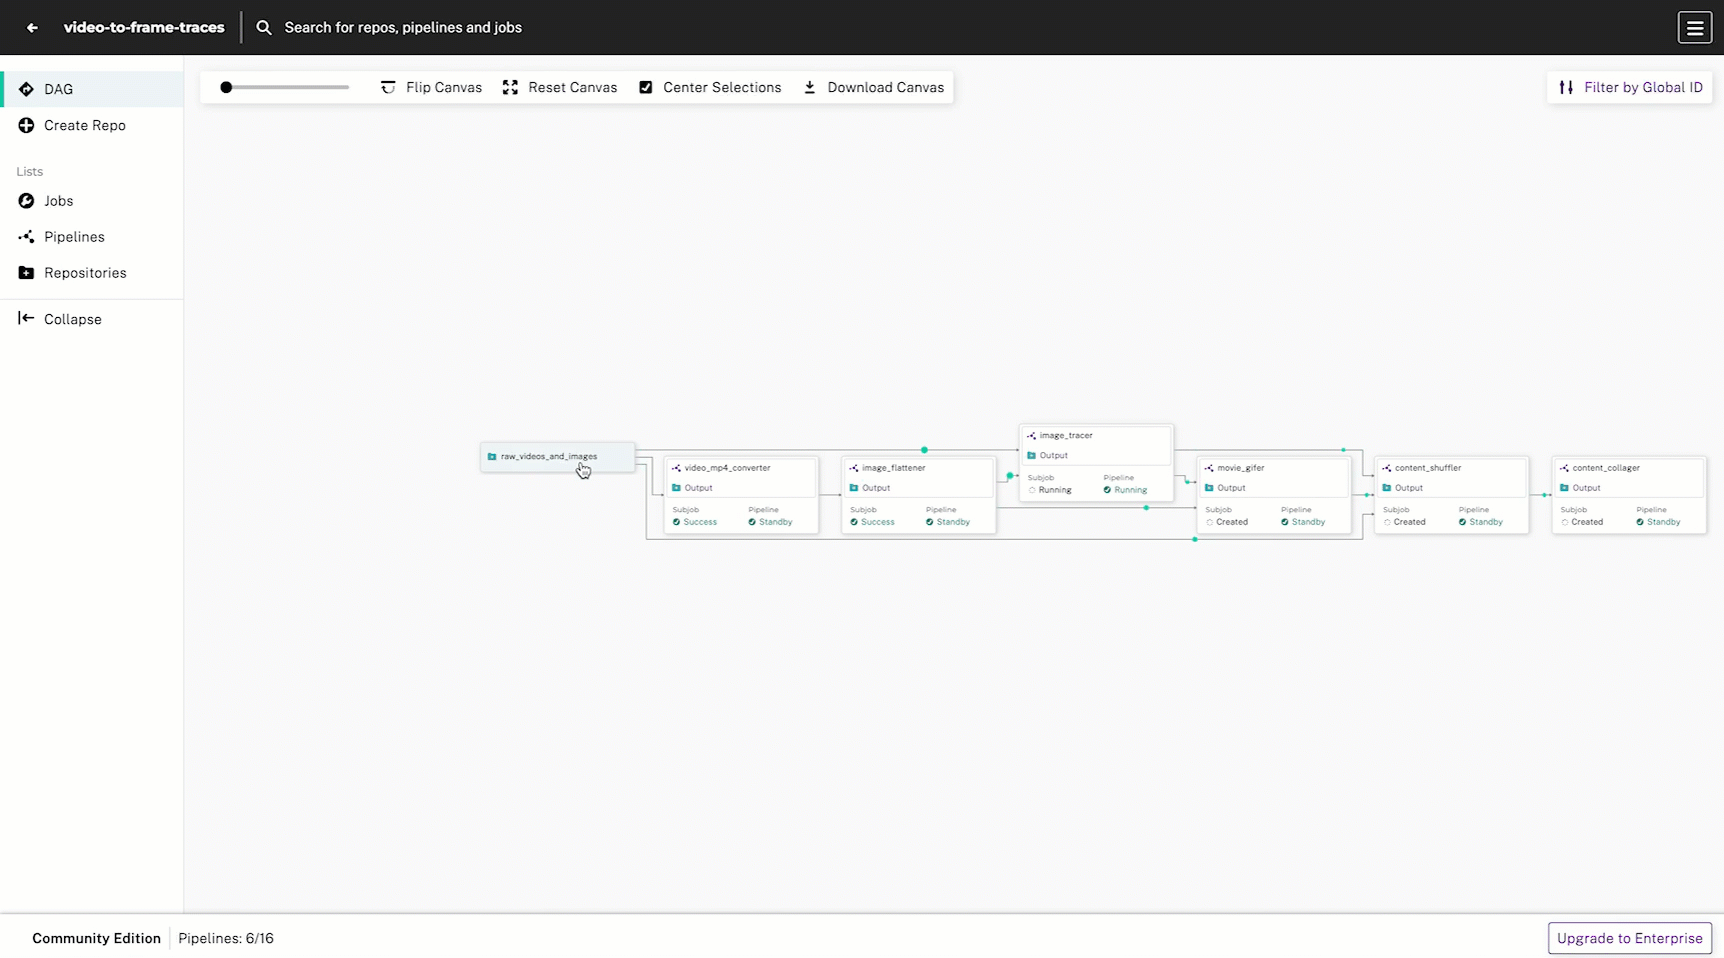
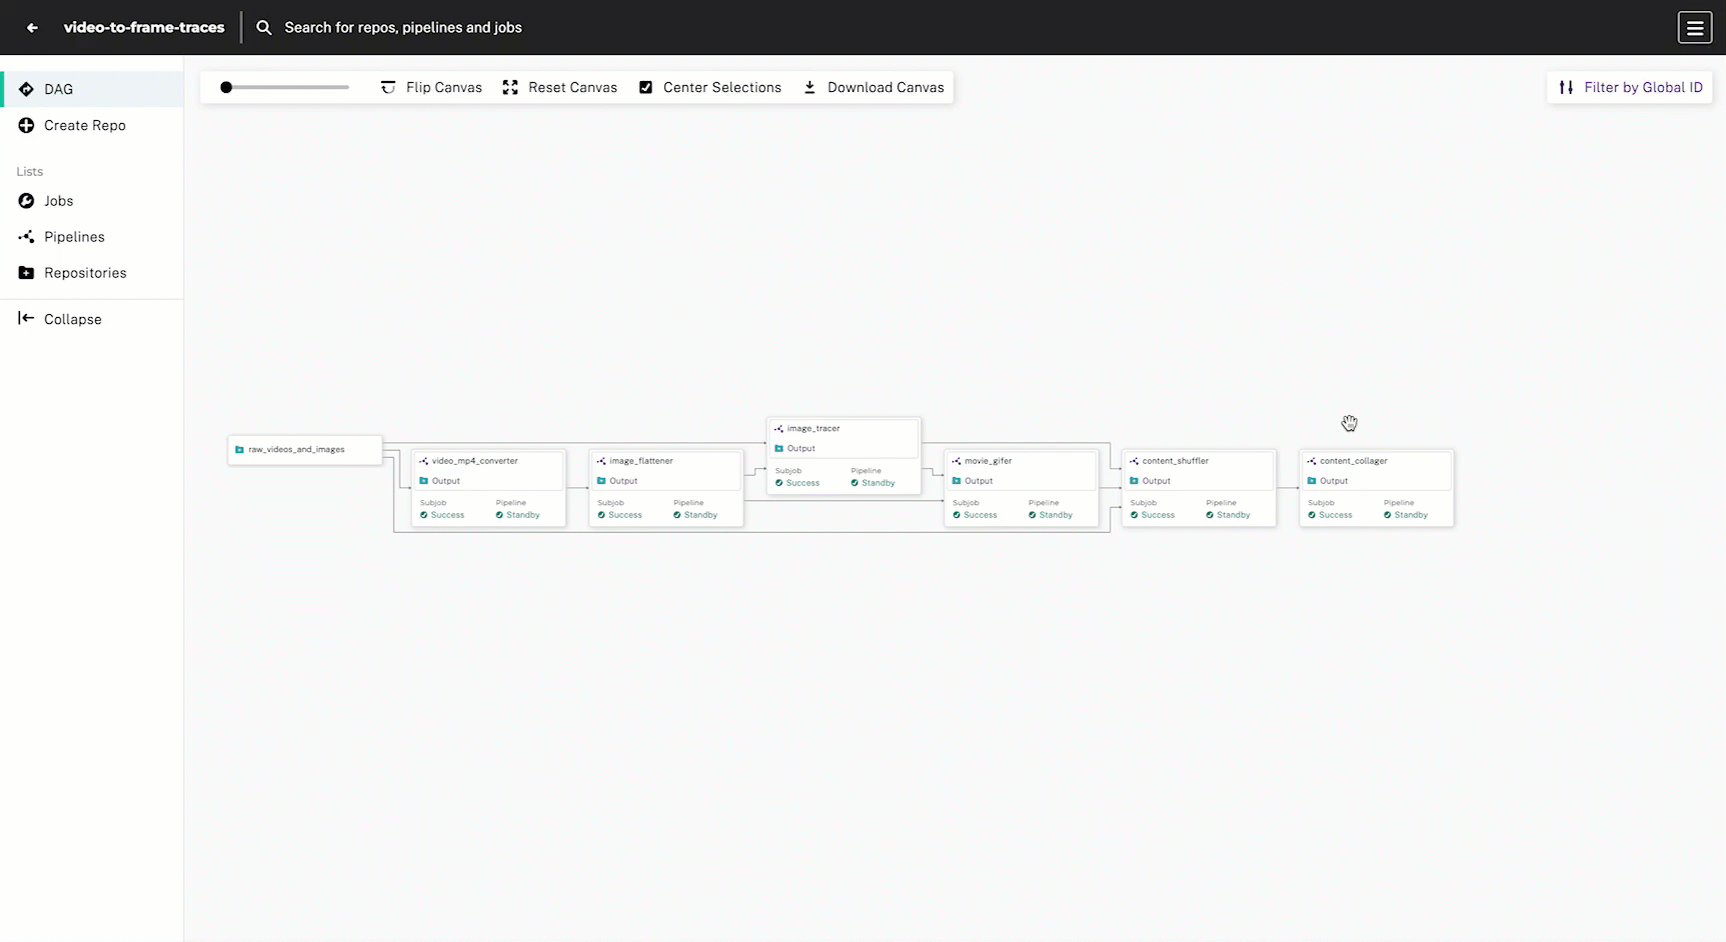
This DAG has 6 steps with the goal of intaking raw photos and video content, drawing edge-detected traces, and outputting a comparison collage of the original and processed images:
- Convert videos to MP4 format
- Extract frames from videos
- Trace the outline of each frame and standalone image
- Create
.gifsfrom the traced video frames - Re-shuffle the content so it is organized by “original” and “traced” images
- Build a comparison collage using a static HTML page

1. Create a Project #
By default, when you first start up an instance, the default project is attached to your active context. Create a new project and set the project to your active PachCTL context to avoid having to specify the project name (e.g., --project video-to-frame-traces) in each command.
pachctl create project video-to-frame-traces
pachctl config update context --project video-to-frame-traces
pachctl list projects
If you are using Pachyderm locally, you can view your project in Console and follow along at http://localhost/lineage/video-to-frame-traces
- Open Console.
- Select Create Project.
- Input a project
nameanddescription. - Select Create.
- Click on the ellipses next to the project name and select Set Active Project.
- Copy the command and input it into your IDE terminal.
2. Create an Input Repo #
At the top of our DAG, we’ll need an input repo that will store our raw videos and images.
pachctl create repo raw_videos_and_images
pachctl list repos- Open Console.
- Scroll to the
video-to-frame-tracesproject. - Select View Project.
- Select Create Repo.
- Input a repo
nameanddescription. - Select Create.
3. Upload Content #
To upload content, you need to specify the repo and branch you’d like to upload to (e.g., a master or staging branch). In Console, it automatically defaults to repo@master — but for PachCTL, you’ll need to use the repo@master:filename.ext pattern. By default, your pipeline will trigger any time new data is uploaded to the master branch unless otherwise specified in the pipeline spec at input.pfs.branch or through a branch trigger. For this tutorial, we’re going to stick with the default master branch.
At the top of our DAG, we’ll need an input repo that will store our raw videos and images.
pachctl put file raw_videos_and_images@master:liberty.png -f https://raw.githubusercontent.com/pachyderm/docs-content/main/images/opencv/liberty.jpg
pachctl put file raw_videos_and_images@master:cat-sleeping.MOV -f https://storage.googleapis.com/docs-tutorial-resoruces/cat-sleeping.MOV
pachctl put file raw_videos_and_images@master:robot.png -f https://raw.githubusercontent.com/pachyderm/docs-content/main/images/opencv/robot.jpg
pachctl put file raw_videos_and_images@master:highway.MOV -f https://storage.googleapis.com/docs-tutorial-resoruces/highway.MOV
You can view the contents of your repo by running the following command:
pachctl list files raw_videos_and_images@master- Open Console.
- Scroll to the
video-to-frame-tracesproject. - Select View Project.
- Select the
raw_videos_and_imagesrepo. - Select the Upload button.
- Upload your image, video, or directory.
- Select Create.
4. Create the Video Converter Pipeline #
We want to make sure that our DAG can handle videos in multiple formats, so first we’ll create a pipeline that will:
- Skip images
- Skip videos already in the correct format (
.mp4) - Convert videos to
.mp4format
The converted videos will be made available to the next pipeline in the DAG via the video_mp4_converter repo by declaring in the user code to save all converted images to /pfs/out/. This is the standard location for storing output data so that it can be accessed by the next pipeline in the DAG.
- Open your IDE terminal.
- Create a new folder for your project called
video-to-frame-traces. - Copy and paste the following pipeline spec into the terminal to create the file.
cat <<EOF > video_mp4_converter.yaml
pipeline:
  name: video_mp4_converter
input:
  pfs:
    repo: raw_videos_and_images
    glob: "/*"
transform:
  image: lbliii/video_mp4_converter:1.0.14
  cmd:
    - python3
    - /video_mp4_converter.py
    - --input
    - /pfs/raw_videos_and_images/
    - --output
    - /pfs/out/
autoscaling: true
EOF- Create the pipeline by running the following command:
pachctl create pipeline -f video_mp4_converter.yaml 
# video_mp4_converter.py
import cv2
import pathlib
import os
import argparse
import shutil

def video_to_mp4(
    input, output, fps: int = 0, frame_size: tuple = (), fourcc: str = "XVID"
):

    print(f"Converting video: {input}")
    vidcap = cv2.VideoCapture(input)
    if not fps:
        fps = round(vidcap.get(cv2.CAP_PROP_FPS))
    success, arr = vidcap.read()
    if not frame_size:
        height, width, _ = arr.shape
        frame_size = width, height
    writer = cv2.VideoWriter(
        output,
        apiPreference=0,
        fourcc=cv2.VideoWriter_fourcc(*fourcc),
        fps=fps,
        frameSize=frame_size,
    )
    frame_count = 0
    while success:
        frame_count += 1
        writer.write(arr)
        success, arr = vidcap.read()
    writer.release()
    vidcap.release()

    print(f"Converted {frame_count} frames")


def process_video_files(input_path, output_path):
    for root, _, files in os.walk(input_path):
        for file in files:
            file_path = os.path.join(root, file)

            # Skip non-video files
            if not file_path.lower().endswith(('.mp4', '.avi', '.mov')):
                print(f"Skipping: {file_path}")
                return

            # Convert video files to MP4
            if file_path.lower().endswith(('.avi', '.mov')):
                base_file = os.path.splitext(file)[0]
                out_path = os.path.join(output_path, base_file + ".mp4")
                video_to_mp4(file_path, output=out_path)
                print(f"Converted: {file} to {out_path}")

            else:
                # Copy existing MP4 files
                out_path = os.path.join(output_path, file)
                print(f"Copying: {file} to {out_path}")
                shutil.copy(file_path, out_path)


def main():
    parser = argparse.ArgumentParser(
        prog='convert_to_mp4.py',
        description='Convert non-MP4 videos to MP4'
    )
    parser.add_argument('-i', '--input', required=True, help='Input video directory')
    parser.add_argument('-o', '--output', required=True, help='Output video directory')
    args = parser.parse_args()

    if not os.path.exists(args.input):
        print("Input directory does not exist.")
        return
    if not os.path.exists(args.output):
        os.makedirs(args.output)

    print(f"Input: {args.input}")
    print(f"Output: {args.output}")
    print("======================")

    process_video_files(args.input, args.output)


if __name__ == "__main__":
    main()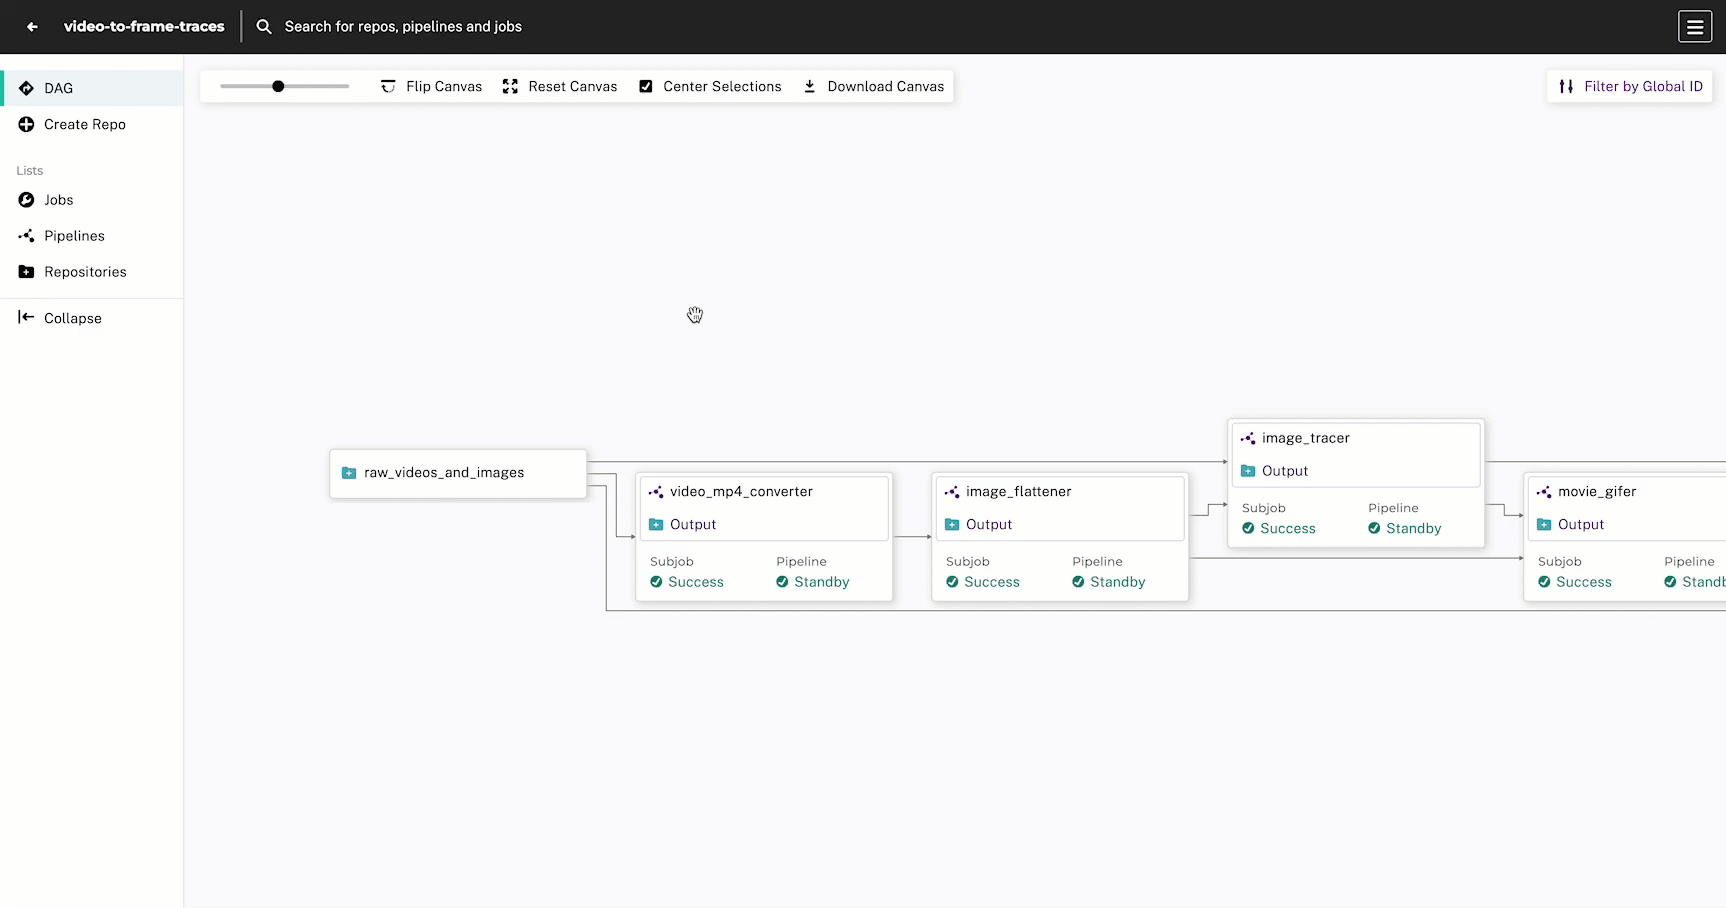
You can view the output commit by running one of following commands:
pachctl list commits video_mp4_converter
pachctl list commits video_mp4_converter@master
PROJECT REPO BRANCH COMMIT FINISHED SIZE ORIGIN DESCRIPTION
video-to-frame-traces video_mp4_converter master 30dadf5cfdf447d2b8ed45644653a509 51 minutes ago 14.05MiB AUTO You can view the output files by running one of the following commands:
pachctl list files video_mp4_converter@master
pachctl list files video_mp4_converter@<commit-id>
NAME TYPE SIZE
/cat-sleeping.mp4 file 7.535MiB
/highway.mp4 file 6.517MiB Every pipeline, at minimum, needs a name, an input, and a transform. The input is the data that the pipeline will process, and the transform is the user code that will process the data. transform.image is the Docker image available in a container registry (Docker Hub) that will be used to run the user code. transform.cmd is the command that will be run inside the Docker container; it is the entrypoint for the user code to be executed against the input data.
5. Create the Image Flattener Pipeline #
Next, we’ll create a pipeline that will flatten the videos into individual .png image frames. Like the previous pipeline, the user code outputs the frames to /pfs/out so that the next pipeline in the DAG can access them in the image_flattener repo.
cat <<EOF > image_flattener.yaml
pipeline:
  name: image_flattener
input:
  pfs:
    repo: video_mp4_converter
    glob: "/*"
transform:
  image: lbliii/image_flattener:1.0.0
  cmd:
    - python3
    - /image_flattener.py
    - --input
    - /pfs/video_mp4_converter
    - --output
    - /pfs/out/
autoscaling: true
EOF
pachctl create pipeline -f image_flattener.yaml
# image_flattener.py
import cv2
import os
import argparse
import pathlib

def flatten_video(vid_path, out_path, base_file):
    os.makedirs(out_path, exist_ok=True)

    current_frame = 0
    video = cv2.VideoCapture(vid_path)

    while True:
        ret, frame = video.read()

        if ret:
            name = os.path.join(out_path, f'{base_file}-frame-{current_frame:010d}.jpg')
            cv2.imwrite(name, frame)
            current_frame += 1
        else:
            break

    video.release()

def process_video_files(input_path, output_path):
    for root, _, files in os.walk(input_path):
        for file in files:
            file_path = os.path.join(root, file)

            if pathlib.Path(file_path).suffix.lower() == '.mp4':
                base_file = os.path.splitext(file)[0]
                out_path = os.path.join(output_path, base_file)
                print(f"Converting: {file}")
                flatten_video(file_path, out_path, base_file)
            else:
                print(f"Skipping: {file_path}")

def main():
    parser = argparse.ArgumentParser(
        prog='flatten_to_images.py',
        description='Flatten Video to Images'
    )
    parser.add_argument('-i', '--input', required=True, help='Input video directory')
    parser.add_argument('-o', '--output', required=True, help='Output image directory')
    args = parser.parse_args()

    if not os.path.exists(args.input):
        print("Input directory does not exist.")
        return
    if not os.path.exists(args.output):
        os.makedirs(args.output)

    print(f"Input: {args.input}")
    print(f"Output: {args.output}")
    print("======================")

    process_video_files(args.input, args.output)

if __name__ == "__main__":
    main()
pachctl list files image_flattener@master6. Create the Image Tracing Pipeline #
Up until this point, we’ve used a simple single input from the Pachyderm file system (input.pfs) and a basic glob pattern (/*) to specify shape of our datums. This particular pattern treats each top-level file and directory as a single datum. However, in this pipeline, we have some special requirements:
- We want to process only the raw images from the
raw_videos_and_imagesrepo - We want to process all of the flattened video frame images from the
image_flattenerpipeline
To achieve this, we’re going to need to use a union input (input.union) to combine the two inputs into a single input for the pipeline.
- For the
raw_videos_and_imagesinput, we can use a more powerful glob pattern to ensure that only image files are processed (/*.{png,jpg,jpeg}) - For the
image_flattenerinput, we can use the same glob pattern as before (/*) to ensure that each video’s collection of frames is processed together
Notice how we also update the transform.cmd to accommodate having two inputs.
cat <<EOF > image_tracer.yaml
pipeline:
  name: image_tracer
description: A pipeline that performs image edge detection by using the OpenCV library.
input:
  union:
    - pfs:
        repo: raw_videos_and_images
        glob: "/*.{png,jpg,jpeg}"
    - pfs:
        repo: image_flattener
        glob: "/*"
transform:
  image: lbliii/image_tracer:1.0.8
  cmd:
    - python3
    - /image_tracer.py
    - --input
    - /pfs/raw_videos_and_images
    - /pfs/image_flattener
    - --output
    - /pfs/out/
autoscaling: true
EOF
pachctl create pipeline -f image_tracer.yaml
# image_tracer.py
import cv2
import numpy as np
from matplotlib import pyplot as plt
import os
import argparse

def make_edges(image, input_path, output_path):
    try:
        img = cv2.imread(image)
        if img is None:
            print(f"Error reading image: {image}")
            return

        tail = os.path.split(image)[1]
        subdirectory = os.path.relpath(os.path.dirname(image), input_path)
        output_subdir = os.path.join(output_path, subdirectory)
        os.makedirs(output_subdir, exist_ok=True)

        edges = cv2.Canny(img, 100, 200)
        output_filename = os.path.splitext(tail)[0] + '_edges.png'
        output_filepath = os.path.join(output_subdir, output_filename)
        plt.imsave(output_filepath, edges, cmap='gray')
        print(f"Processed: {image} -> {output_filepath}")

    except Exception as e:
        print(f"Error processing image: {image}")
        print(f"Error details: {e}")

def process_image_files(input_path, output_path):
    for dirpath, dirs, files in os.walk(input_path):
        total = len(files)
        current = 0
        for file in files:
            current += 1
            print(f"Processing {file}, #{current} of {total}")
            make_edges(os.path.join(dirpath, file), input_path, output_path)

def main():
    parser = argparse.ArgumentParser(
        prog='image_tracer.py',
        description='Trace Images'
    )
    parser.add_argument('-i', '--input', nargs='+', required=True, help='Input image directory')
    parser.add_argument('-o', '--output', required=True, help='Output image directory')
    args = parser.parse_args()

    print(f"Input: {args.input}")
    print(f"Output: {args.output}")
    print("======================")

    for input_path in args.input:
        if not os.path.exists(input_path):
            print(f"Input directory does not exist: {input_path}")
        else:
            print(f"Processing images in: {input_path}")
            process_image_files(input_path, args.output)

    print("Done.")
    return

if __name__ == "__main__":
    main()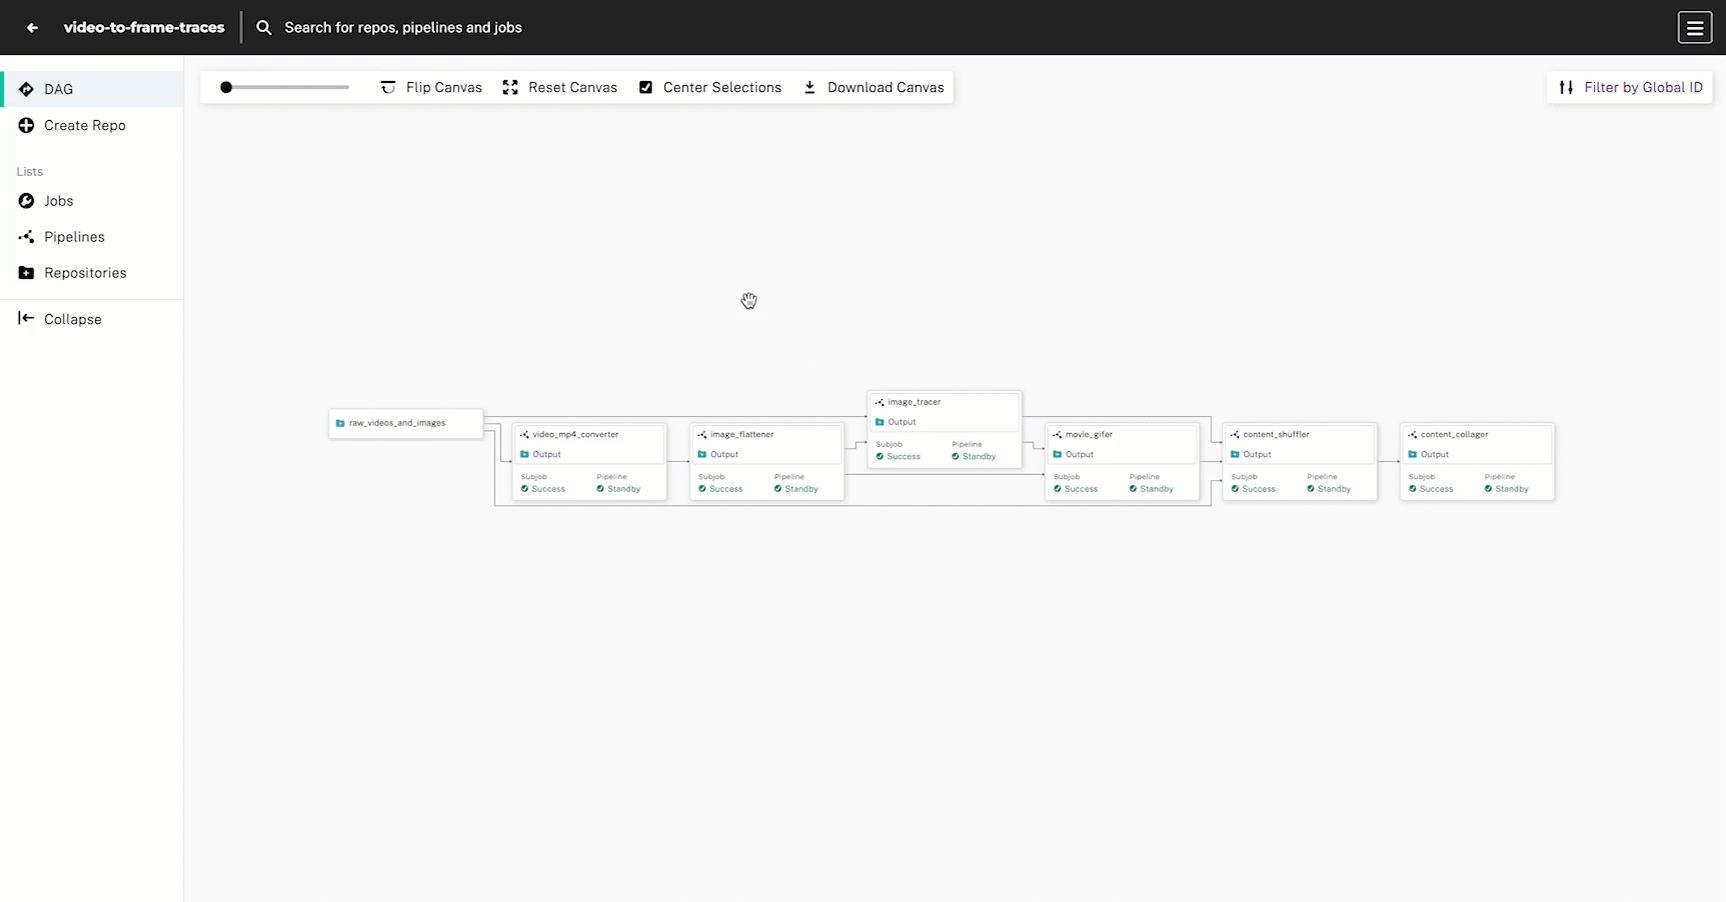
pachctl list files image_tracer@masterSince this pipeline is converting videos to video frames, it may take a few minutes to complete.
7. Create the Gif Pipeline #
Next, we’ll create a pipeline that will create two gifs:
- A gif of the original video’s flattened frames (from the
image_flatteneroutput repo) - A gif of the video’s traced frames (from the
image_traceroutput repo)
To make a gif of both the original video frames and the traced frames, we’re going to again need to use a union input so that we can process the image_flattener and image_tracer output repos.
Notice that the glob pattern has changed; here, we want to treat each directory in an input as a single datum, so we use the glob pattern /*/. This is because we’ve declared in the user code to store the video frames in a directory with the same name as the video file.
cat <<EOF > movie_gifer.yaml
pipeline:
  name: movie_gifer
description: A pipeline that converts frames into a gif using the OpenCV library.
input:
  union:
    - pfs:
        repo: image_flattener
        glob: "/!(*.*)"
    - pfs:
        repo: image_tracer
        glob: "/!(*.*)"
transform:
  image: lbliii/movie_gifer:1.0.5
  cmd:
    - python3
    - /movie_gifer.py
    - --input
    - /pfs/image_flattener
    - /pfs/image_tracer
    - --output
    - /pfs/out/
autoscaling: true
EOF
pachctl create pipeline -f movie_gifer.yaml
# movie_gifer.py
import cv2
import os
import argparse
import imageio

def make_gifs(directory, input_path, output_path):
    try:

        # Create output folder if it doesn't exist
        relative_dir = os.path.relpath(directory, input_path)
        output_folder = os.path.join(output_path, relative_dir)
        os.makedirs(output_folder, exist_ok=True)

        # Get all the images in the provided directory
        images = [os.path.join(directory, f) for f in os.listdir(directory) if f.endswith('.jpg') or f.endswith('.png')]

        # Sort the pngs so they are in order
        images.sort()

        # Create the output filename
        tail = os.path.split(directory)[1]
        base_filename = os.path.splitext(tail)[0]

        if 'tracer' in input_path:
           suffix = 'edges'
        else:
            suffix = 'original'
        output_filename = f'{base_filename}_{suffix}.gif'
        output_filepath = os.path.join(output_folder, output_filename)

        # Create the gif
        gif_images = [cv2.imread(i)[:, :, ::-1] for i in images]  # Convert BGR to RGB
        imageio.mimsave(output_filepath, gif_images, duration=0.1)

        print(f"Processed: {directory} -> {output_filepath}")

    except Exception as e:
        print(f"Error processing directory: {directory}")
        print(f"Error details: {e}")

def process_image_directories(input_path, output_path):
    # For each directory of images, make a gif
    for dirpath, dirs, files in os.walk(input_path):
        total = len(dirs)
        current = 0
        for dir in dirs:
            current += 1
            print(f"Processing {dir}, #{current} of {total}")
            make_gifs(os.path.join(dirpath, dir), input_path, output_path)

def main():
    parser = argparse.ArgumentParser(
        prog='movie_gifer.py',
        description='Convert images to gifs'
    )
    parser.add_argument('-i', '--input', nargs='+', required=True, help='Input image directory')
    parser.add_argument('-o', '--output', required=True, help='Output image directory')
    args = parser.parse_args()

    print(f"Input: {args.input}")
    print(f"Output: {args.output}")
    print("======================")

    for input_path in args.input:
        if not os.path.exists(input_path):
            print(f"Input directory does not exist: {input_path}")
        else:
            print(f"Processing images in: {input_path}")
            process_image_directories(input_path, args.output)

    print("Done.")

if __name__ == "__main__":
    main()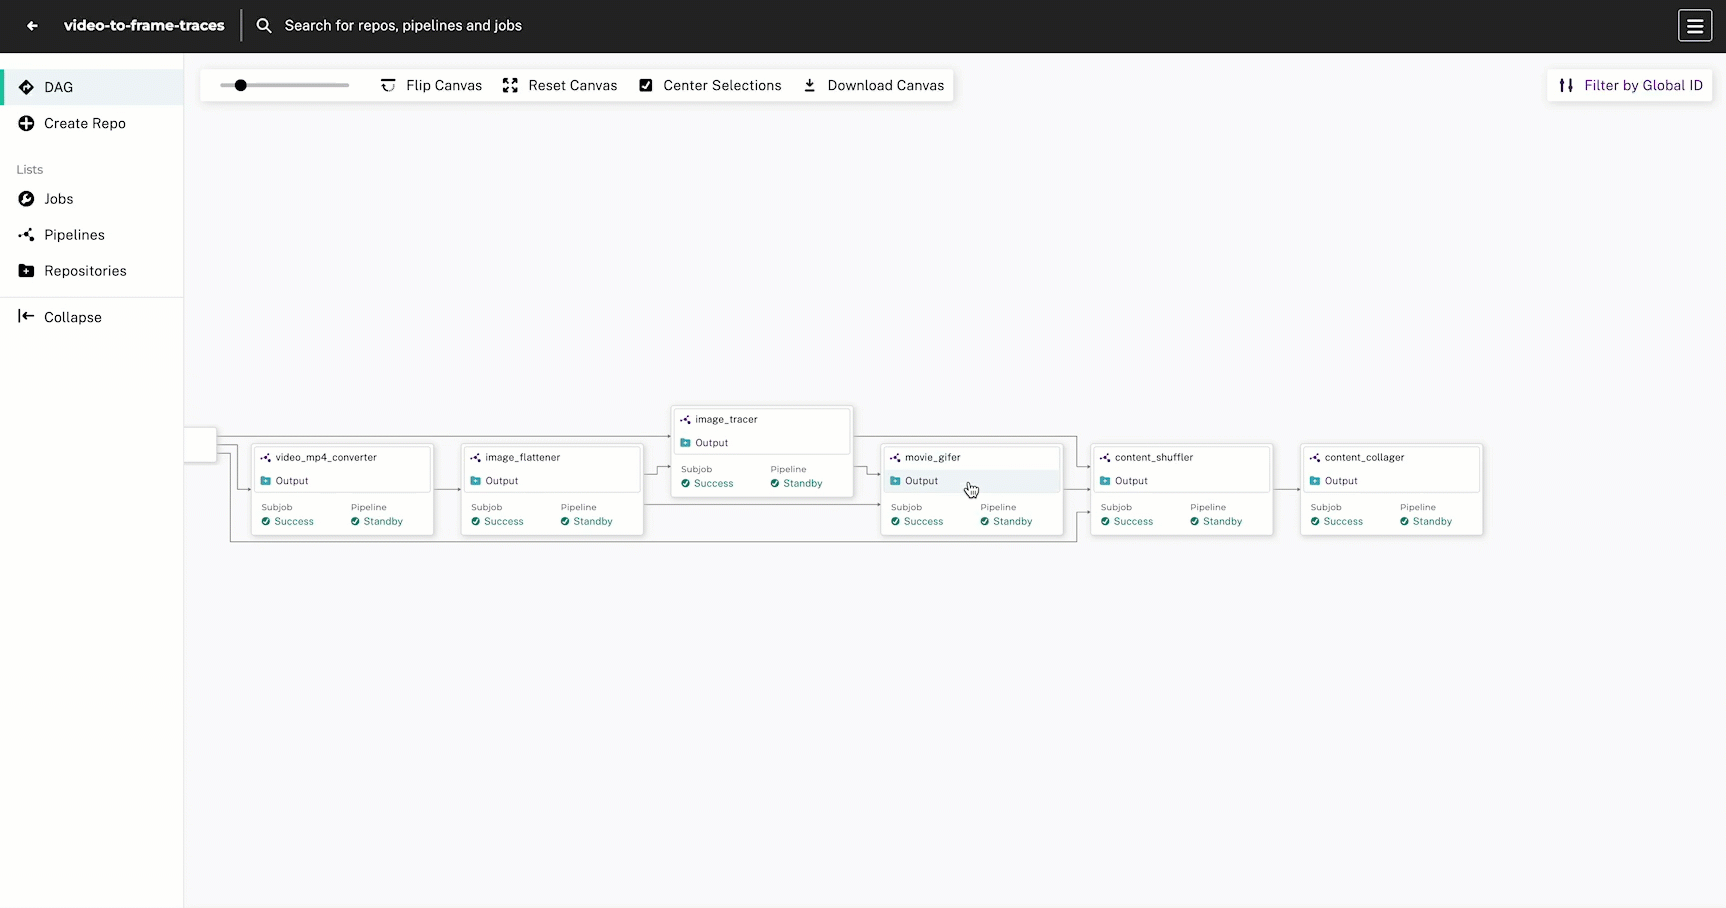
pachctl list files movie_gifer@masterSince this pipeline is converting video frames to gifs, it may take a few minutes to complete.
8. Create the Content Shuffler Pipeline #
We have everything we need to make the comparison collage, but before we do that we need to re-shuffle the content so that the original images and gifs are in one directory (originals) and the traced images and gifs are in another directory (edges). This will help us more easily process the data via our user code for the collage. This is a common step you will encounter while using Pachyderm referred to as a shuffle pipeline.
cat <<EOF > content_shuffler.yaml
pipeline:
  name: content_shuffler
description: A pipeline that collapses our inputs into one datum for the collager.
input:
  union:
    - pfs:
        repo: movie_gifer
        glob: "/"
    - pfs:
        repo: raw_videos_and_images
        glob: "/*.{png,jpg,jpeg}"
    - pfs:
        repo: image_tracer
        glob: "/*.{png,jpg,jpeg}"

transform:
  image: lbliii/content_shuffler:1.0.0
  cmd:
    - python3
    - /content_shuffler.py
    - --input
    - /pfs/movie_gifer
    - /pfs/raw_videos_and_images
    - /pfs/image_tracer
    - --output
    - /pfs/out/
autoscaling: true
EOF
pachctl create pipeline -f content_shuffler.yaml
# content_shuffler.py
import argparse
import os
import shutil

def shuffle_content(input_path, output_path):
    # create an originals and edges directory in the output path
    originals_output_path = f"{output_path}/originals"
    if not os.path.exists(originals_output_path):
        os.makedirs(originals_output_path)

    edges_output_path = f"{output_path}/edges"
    if not os.path.exists(edges_output_path):
        os.makedirs(edges_output_path)

    for dirpath, dirs, files in os.walk(input_path):
        for file in files:
            if "frame" and "edges" not in file:
                # Copy the original image to the originals directory
                shutil.copy(f"{dirpath}/{file}", originals_output_path)
            elif "frame" not in file and "edges" in file:
                # Copy the images and gifs to the edges directory
                shutil.copy(f"{dirpath}/{file}", edges_output_path)

def main():
    parser = argparse.ArgumentParser(
        prog='content_collager.py',
        description='Convert images and gifs into a collage'
    )
    parser.add_argument('-i', '--input', nargs='+', required=True, help='Input image directory')
    parser.add_argument('-o', '--output', required=True, help='Output image directory')
    args = parser.parse_args()

    print(f"Input: {args.input} \nOutput: {args.output}\n")

    total_inputs = len(args.input)
    current_input = 0
    for input_path in args.input:
        try:
            current_input += 1
            print(f"{input_path}; {current_input}/{total_inputs}")
            shuffle_content(input_path, args.output)
        except Exception as e:
            print(f"Exception: {e}")

if __name__ == "__main__":
    main()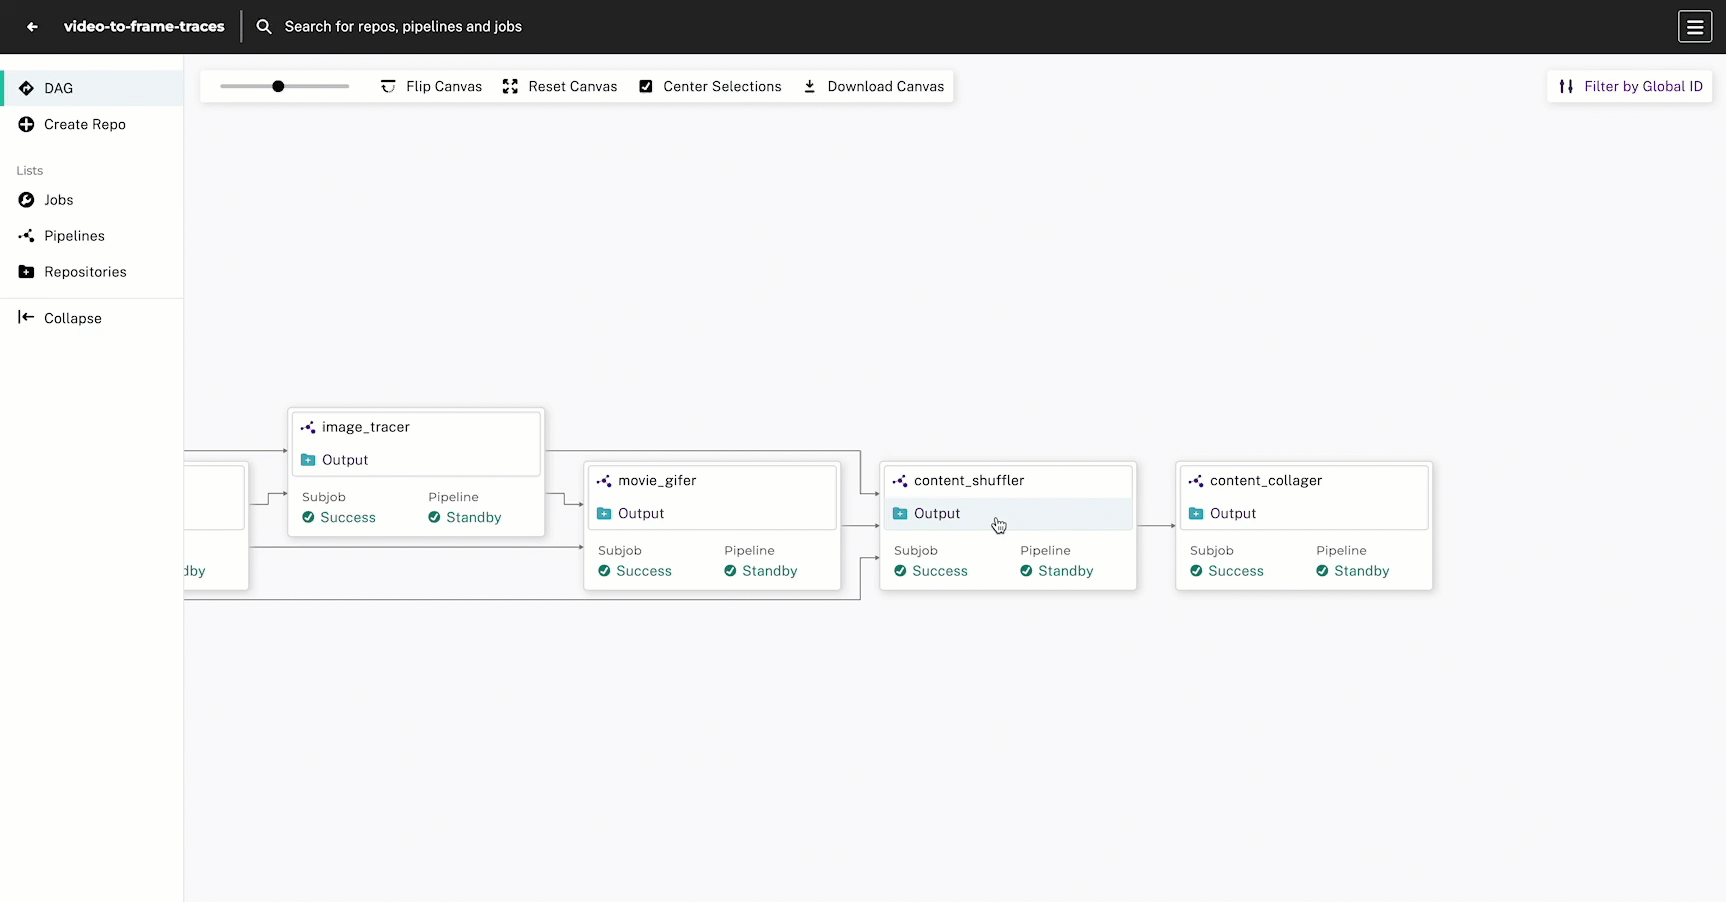
pachctl list files content_shuffler@master9. Create the Content Collager Pipeline #
Finally, we’ll create a pipeline that produces a static html page for viewing the original and traced content side-by-side.
cat <<EOF > content_collager.yaml
pipeline:
  name: content_collager
  description: A pipeline that creates a static HTML collage.
input:
  pfs:
    glob: "/"
    repo: content_shuffler


transform:
  image: lbliii/content_collager:1.0.64
  cmd:
    - python3
    - /content_collager.py
    - --input
    - /pfs/content_shuffler
    - --output
    - /pfs/out/
autoscaling: true
EOF
pachctl create pipeline -f content_collager.yaml
# content_collager.py
import os
import argparse
from bs4 import BeautifulSoup
import shutil

html_template = """
<html>
<head>
<title>Content Collage</title>
<style>
  #collage-container {
    display: flex;
  }

  #originals,
  #edges {
    flex: 1;
    padding: 20px;
    border: 1px solid #ccc;
    display: flex;
    flex-direction: column;
    align-items: center;
    gap: 10px;
  }
</style>
</head>
<body>
<h1>Content collage</h1>
<div id="collage-container">
<div id="originals">
<h2>Original</h2>
</div>
<div id="edges">
<h2>Edges</h2>
</div>
</div>
</body>
</html>
"""

def create_html_page(output_path):
    index_path = os.path.join(output_path, "collage", "index.html")

    if not os.path.exists(os.path.join(output_path, "collage")):
        os.makedirs(os.path.join(output_path, "collage"))

    if not os.path.exists(index_path):
        with open(index_path, "w") as f:
            f.write(html_template)

def append_image_to_html_page(output_path, image_path):
    index_path = os.path.join(output_path, "collage", "index.html")

    with open(index_path, "r") as f:
        html_content = f.read()

    soup = BeautifulSoup(html_content, "html.parser")
    # if the image path has the word "originals" in it, add it to the originals div
    if "edges" in image_path:
        originals_div = soup.find("div", id="edges")
        if originals_div:
            img_tag = soup.new_tag("img", src=image_path, width="300", style="display: block;")
            originals_div.append(img_tag)

        with open(index_path, "w") as f:
            f.write(str(soup))
    # otherwise, add it to the collage div
    else:
        collage_div = soup.find("div", id="originals")
        if collage_div:
            img_tag = soup.new_tag("img", src=image_path, width="300", style="display: block;")
            collage_div.append(img_tag)

        with open(index_path, "w") as f:
            f.write(str(soup))

def process_content(input_path, output_path):
    try:
        # Create the HTML page
        create_html_page(output_path)

        # Create the output directory /collage/static
        static_output_path = os.path.join(output_path, "collage", "static")
        if not os.path.exists(static_output_path):
            os.makedirs(static_output_path)

        for dirpath, _, files in os.walk(input_path):
            sorted_files = sorted(files)
            for file in sorted_files:
                print(f"Copying {file} to {static_output_path}")
                shutil.copy(os.path.join(dirpath, file), os.path.join(static_output_path, file))
                append_image_to_html_page(output_path, f"./static/{file}")

    except Exception as e:
        print(f"Exception: {e}")

def main():
    parser = argparse.ArgumentParser(
        prog='content_collager.py',
        description='Convert images and gifs into a collage'
    )
    parser.add_argument('-i', '--input', nargs='+', required=True, help='Input image directory')
    parser.add_argument('-o', '--output', required=True, help='Output image directory')
    args = parser.parse_args()

    print(f"Input: {args.input} \nOutput: {args.output}\n")

    try:
        process_content(args.input[0], args.output)
    except Exception as e:
        print(f"Exception: {e}")

if __name__ == "__main__":
main()- Navigate to your project in Console.
- Click on the
content_collagerpipeline’s output directory. - Click Inspect Commit.
- Check the collage directory.
- Select the Download button.
- Unzip and open the
index.htmlfile in your browser to see the collage.
pachctl list files content_collager@master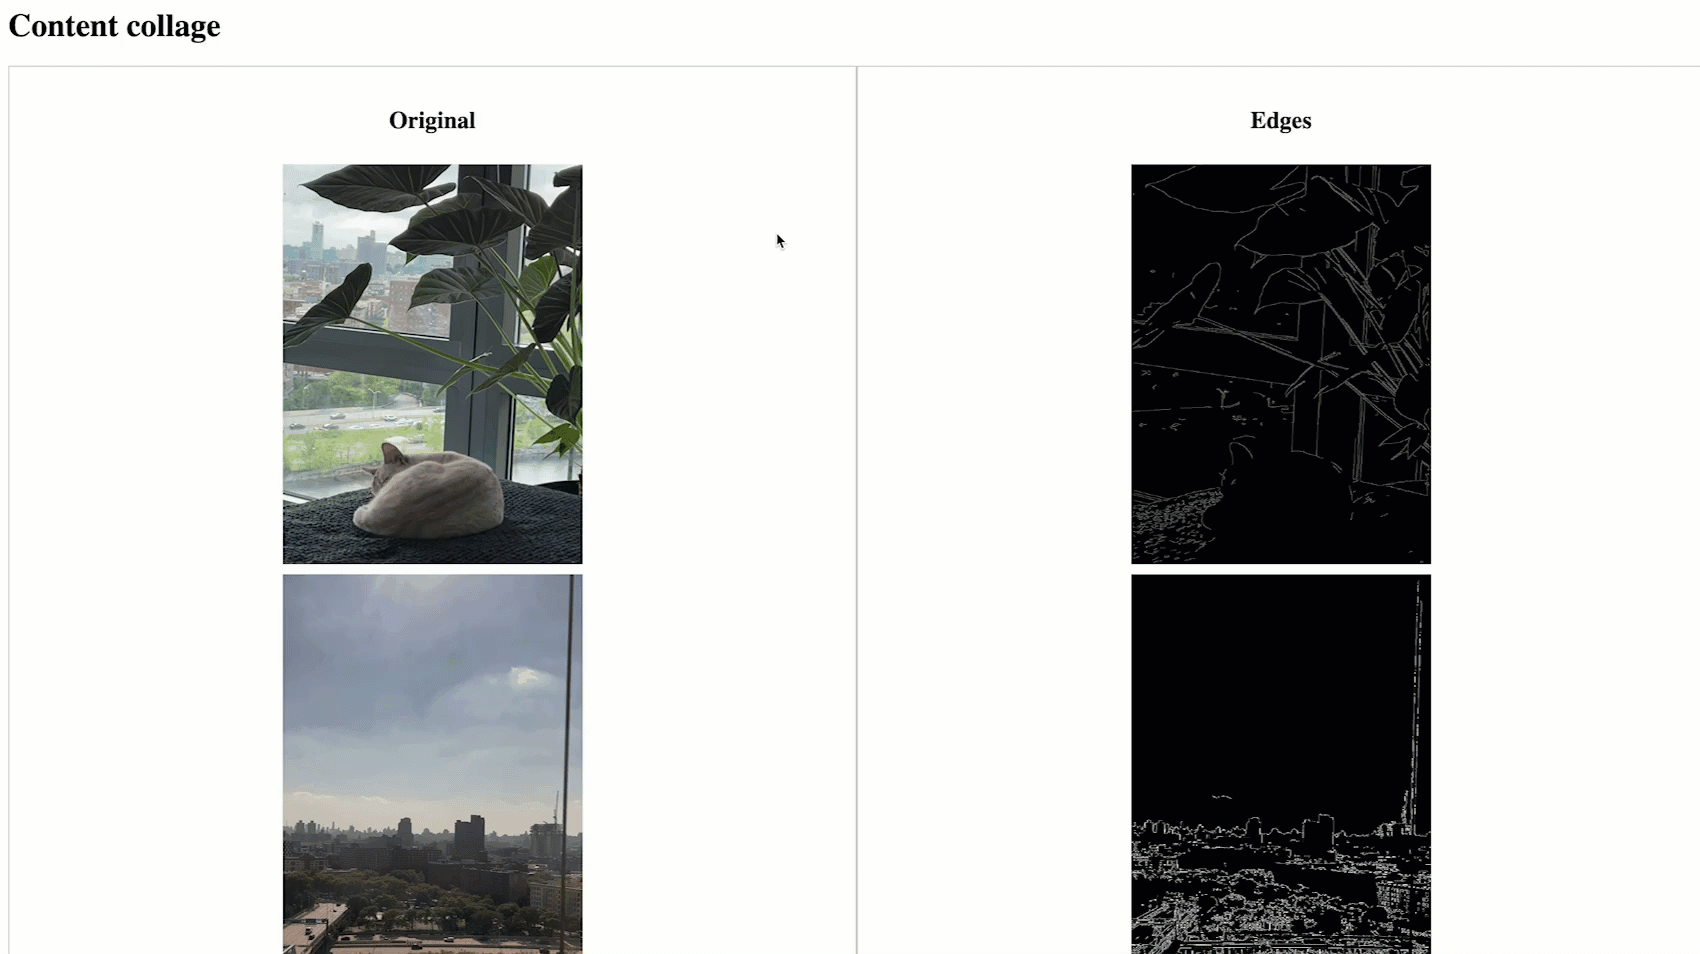
Exploring Resources, Data, & Logs #
Congratulations! You’ve successfully created a DAG of pipelines that process video files into a collage. However, we’ve only just scratched the surface of what you can do with Pachyderm. Now that you have a working pipeline, try out some of these commands to explore all of the details associated with the DAG.
You can quickly take an account of all the resources you’ve created by listing them in the terminal.
pachctl list projects
pachctl list repos
pachctl list pipelines
pachctl list commits
pachctl list jobs --pipeline content_collager
pachctl list files content_collager@master
You can inspect resources to get key details from within the terminal. This is a fast and easy way to validate resource creation and config.
pachctl inspect project video-to-frame-traces
pachctl inspect repo content_collager
pachctl inspect commit content_collager@<commit-id>
pachctl inspect pipeline content_collager
pachctl inspect files content_collager@master
Let’s say you’ve uploaded corrupted data or realized that your pipeline’s glob pattern/user code is flawed and you want to stop job processing and take a look at your logs. There’s a number of commands you can run to get to the bottom of the issue.
pachctl stop pipeline content_collager
pachctl stop job content_collager@<job-id>
pachctl logs --pipeline content_collager
pachctl debug dump debug_dump.tar.gz
Once you’ve updated your pipeline spec/user code, you’ll want to reprocess the data for one of your pipelines. Here’s how you can do that:
pachctl update pipeline -f content_collager.yaml --reprocessFor a comprehensive list of operations, check out the Build DAGs section of the documentation or browse the Command Library.
Bonus Exercise #
- How would you update the glob pattern in the video converter pipeline spec (
video_mp4_converter.yaml) to only process video files in theraw_videos_and_imagesrepo? That would enable you to reduce the complexity of the user code indef process_video_filesand make the pipeline more efficient.